
Spring Boot Starter Test
The Spring Boot Starter Test dependency is a primary dependency for testing the Spring Boot Applications. It holds all the necessary elements required for the testing.
In Spring Boot, there are lots of tests that can be performed over a Spring Boot application. To perform these tests we have to integrate the testing framework.
The beauty of the Spring Boot framework is that for any tasks we just have to put a single dependency in our pom.xml file, instead of writing too many lines of boilerplate code. So, for the testing, we just need to put the spring-boot-starter-dependency in our Spring Boot Application.
In this section of the learning Spring Boot Series, we will create a simple Spring Boot Application using the Spring Initializr and perform a Junit test on our Spring Boot application.
Let’s see the schema of Spring Boot Starter Test dependency:
spring-boot-starter-test:
<!-- https://mvnrepository.com/artifact/org.springframework.boot/spring-boot-starter-test -->
<dependency>
    <groupId>org.springframework.boot</groupId>
    <artifactId>spring-boot-starter-test</artifactId>
    <version>2.4.2</version>
    <scope>test</scope>
</dependency>
We can always get the latest version of the Spring Boot Starter Test dependency from Here.
The above schema will automatically fetch all the required dependencies and jars for the testing. After adding this schema, we will be able to perform a simple unit test for our Spring Boot application. We can either create a Spring Boot project or generate it using the easiest way Spring Initializr.
If we want to add the test dependency manually, we will add the above schema to the bottom of the pom.xml file under the <dependencies> tag.
The scope of the test declared like <scope>test</scope> is available for when the application is bundled and packaged for deployment, it will ignore any dependency that is declared with the test scope.
The test scope dependencies are only used when running in the development and Maven test modules.
The Spring Boot Test dependencies are packaged with a Spring Boot project when we bootstrap it. It contains the test dependency in the pom.xml file and ApplicationNameTest.java file under the src/test/java. So, we do not need to put it manually in our Spring Boot project.
Let’s understand it with a simple web application:
Before diving into our main topic, let’s have a quick look at the Unit Testing:
What is Unit Testing in Spring Boot
Unit Testing is a type of software testing in which the individual units of a software component are tested. The main purpose of performing the unit test is to ensure whether every unit of the project is performing as expected or not. The Unit Test operation is performed by the developers during the software development phase. Unit test takes a piece of code and validate its correctness. An individual unit may be a function, method, module, project, or object.
Let’s understand how to perform unit tests in a Spring Boot project using the Spring Boot Starter Test.
How to Perform Unit Test in a Spring Boot Project
We are going to create a basic Spring Boot project and perform the test operation over it.
Follow the below steps to perform a unit test in a Spring Boot application:
Step1: Create a Web Project
In this tutorial, we are using the Spring Initializr to generate the Spring Boot project. But, you can use any of the methods to create a Spring Boot Project.
Open Spring Initializr.
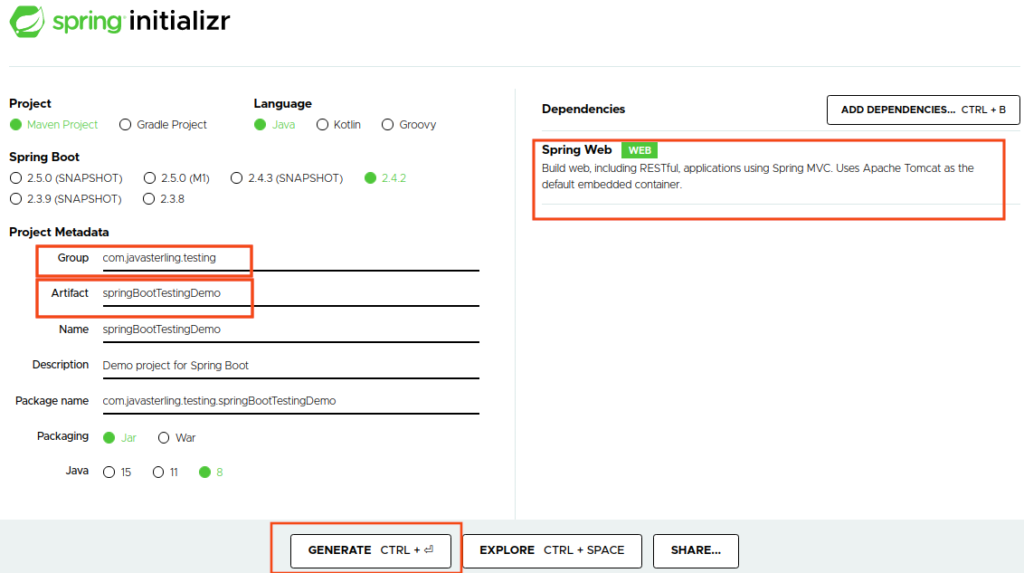
Step2: Provide the Project details
The Next step is to provide the project details, in our example, we are providing the Group name as com.javasterling.testing and Artifact as SpringBootTestingDemo. You can choose the same or your desired project description.
Step3: Add the Spring Web Dependency
Since we are developing a web application so make sure to add the Spring Web dependency.
Step4: Generate the Project
Now, Generate the Project by clicking on the Generate option. Our project details will look like as follows:
Step5: Extract the Project
The above steps will download a jar file of the project. Now, extract this project to your Spring Boot workspace.
Step6: Import the Project into IDE
Now, import this project into your favorite IDE such as Eclipse or STS (Spring Tool Suite). We are using the STS, but, it will work the same in other IDEs.
To import in STS, navigate to File-> Open project from External File System or File-> Import-> Existing Maven Projects and browse the directory and select it.
It will take some time to import the jar files.
See How to Import project in Spring Tool Suite and Eclipse.
After importing the project, we can see our project directory by exploring the project. It will look something as follows:

We can see by default our application contains the follwing files and data:
SpringBootTestingDemoApplication.java (src/main/java):
package com.javasterling.testing.springBootTestingDemo;
import org.springframework.boot.SpringApplication;
import org.springframework.boot.autoconfigure.SpringBootApplication;

@SpringBootApplication
public class SpringBootTestingDemoApplication {

	public static void main(String[] args) {
		SpringApplication.run(SpringBootTestingDemoApplication.class, args);
	}

}
SpringBootTestingDemoApplicationTest.java (src/test/java):
package com.javasterling.testing.springBootTestingDemo;
import org.junit.jupiter.api.Test;
import org.springframework.boot.test.context.SpringBootTest;

@SpringBootTest
class SpringBootTestingDemoApplicationTests {
	@Test
	void contextLoads() {
	}
}
In this section, Our main focus is on the Test file so let’s understand the code of the SpringBootTestingDemoApplicationTest.java file.
As we can see from the above code, by default, there are two annotations in the above code; @SpringBootTest, and @Test.
@SpringBootTest
The @SpringBootTest annotation applies on a Test Class that runs Spring Boot based tests. It provides the following features and functionality to our Spring Boot project:
- By default, it implements SpringBootContextLoader as the default ContextLoader if no specific context loader is defines.
- It searches for a @SpringBootConfiguration when nested @Configuartion is not used, and no explicit classes are specified.
- It enables the support for different WebEnvironment modes.
- It registers a TestRestTemplate or WebTestClient bean for use in web tests that are using the webserver.
- It enables the application arguments to be defined using the args attribute.
Step7: Perform the Unit Testing
Now, our final step is to perform the Unit testing. To perform the unit testing, open the SpringBootTestingDemoApplicationTest.java, right-click and run it as Junit Test.
When we run it as Junit Test, it will start our Spring Boot Application:

And, displays the following Output:

Conclusion:
Hence, we can see how to use Spring Boot Starter Test Dependency to test our Spring Boot Applications. However, there is no need to add the spring-boot-starter-test dependency manually because the Spring Boot by default packaged it.
Download the Above Example by clicking on the below Download button:
See Also,
Spring Boot Starters
Spring Boot Starter Web
Spring Boot Starter Parent
Spring Boot Starter Data JPA
Spring Boot Dependencies
Spring Boot Annotations