
Java is one of the most used programming languages over the globe. It is a platform-independent language which means we can write Java program anywhere and run it on any platform having the JRE. For example, we can write a Java program on a Windows platform and can run it on a Linux system or Mac OS. In this section, we will see how to install Java on Windows. We will download and install JDK 8 (Java Development Kit) on Windows 10.
Let’s have a look at quick index of the topic:
- What is Java?
- Requirements for installing Java on Windows
- Download and Install JDK 8 on Windows 10
- Verify the Installation
- Offline installation of Java
- How to remove older versions of Java
- How to set environment variable on Windows
- First Java Program on Windows
- Summary
Let’s start:
What is Java?
Java is a high-level programming language used to develop different types of applications such as web applications, mobile applications, desktop applications, etc. we can easily write, compile and debug a Java program.
Java provides several advanced features to make the development process easy and productive.
Java is a platform-independent language. The main motive of developing the Java language is to “write once and run anywhere”.
Some key features of Java programming languages are as follows:
- Object-Oriented
- Simple
- Platform Independent
- Secure
- Architecture-neutral
- Robust
- Portable
- Multi-threaded
- Distributed
- Dynamic
- High-performance
See more about what is Java?
System Requirements for Installing Java on Windows
We are discussing the minimum system requirements for installing Java 8. Because Java 8 is a stable release of Java. These requirements is also about the same for the other Java versions:
- Windows 10 (8u51 and above)
- Windows 8.x (Desktop)
- Windows 7 SP1
- Windows Vista SP2
- Windows Server 2008 R2 SP1 (64-bit)
- Windows Server 2012 and 2012 R2 (64-bit)
- RAM: 128 MB
- Disk space: 124 MB for JRE; 2 MB for Java Update
- Processor: Minimum Pentium 2 266 MHz processor
- Browsers: Internet Explorer 9 and above, Firefox
We will install Java 8 on Windows 10.
See more about the system Requirements to install java.
Download and Install JDK 8 on Windows 10
Download JDK 8
Follow the below steps to download JDK 8 from the official Oracle website:
Step1: Open Oracle Website
Follow this link, it will redirect you to oracle’s website. Here you can find all the releases of Java. To download Java 8 scroll down the page and navigate to Java SE 8 section:

Click on the JDK download option.
Step2: Select the Windows Version
Now, select your windows version for which you want to install. In our case, the Window is 64 bit.

Step3: Select License Agreement
Select the license agreement and click on the Download JDK button. It will redirect you to the oracle login page:

Step4: Login or Create Oracle Account
If you have an Oracle account then login with your credentials, otherwise create a new account by clicking on the Create Account button:

It will start downloading the .exe file. By following the above steps, we have successfully downloaded the JDK 8. Now install it on your system:
Install JDK 8 on Windows
To install the JDK 8 on Windows, follow the below steps:
Step1: Run the installer File
Now, run the downloaded .exe file by clicking on it. It will ask for the confirmation click Yes to continue. It will display the following window:

Click on the Next button to continue.
Step2: Select optional features to install
This window asks for the optional features to install. Our requirement is only for the Development tools select it and click on Next to continue the installation process:

It will start installing the setup.

Step3: Select the Destination Folder
If you want to use a custom installation folder then you can change it by clicking on the Change option. Otherwise, it will be installed on its default folder which is c:\Program Files\Java\jre1.8.0_281.
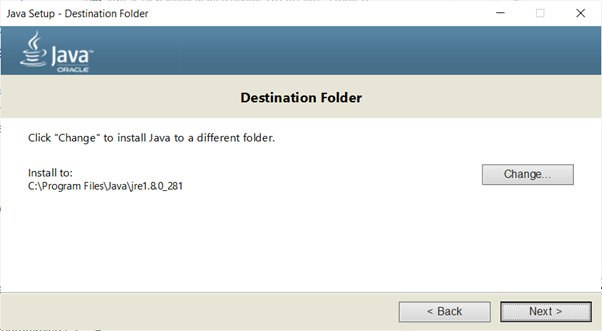
Click Next to continue. It will start downloading the required packages under the specified directory.

Step4: Installation Successful Status
Now, Java is successfully installed on our machine. It will display the successful status. Click on the Close button to exit from the process.

Now, we can verify the installation status.
Verify the Installation
To verify the installation status, open the command prompt on your windows system and execute the below command:
java -version
As we can see from the above output, Java is successfully installed on our machine.
Offline Installation of Java
To install Java offline, we need an executable installer file. In offline installation, there is no need for our system to be connected to the internet during the installation process. We can also copy this file for other systems. Follow the below steps to install Java offline on Windows:
- Go to the Manual download page
- Click on Windows Offline.
- Save the file
- After downloading the installer file, close all applications including the browser.
- Run the downloaded file to start the installation process.
- The installation process starts. Click the Install button to accept the license terms and to continue with the installation.
How to Remove Older Versions of Java from Windows
The latest version of Java is always recommended by the Java community because it contains several updates and bug-fixes. Thus, it provides an improved performance and several additional features. To confirm the installed version of Java, execute the below command:
java –version
It will list all the installed versions.
Removing a Java version from windows is a similar process as uninstalling software.
- Open control panel and
- navigate to uninstall software.
- Find the Java and select it.
- Now, click uninstall to remove it from your system.
How to Set Java Environment Variable On Windows
Before setting the environment variable it is necessary to understand why we set the environment variable and why they are crucial for our system?
The Environment variables are global system variables that can be accessed by all the processes/users running on the system. They are useful to store system-wide values such as PATH, OS, PC name, User Name, System Root, HomePath, etc.
Let’s understand how to set the environment variable in Windows.
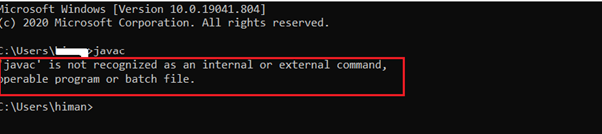
First, verify whether the environment variable is set on your machine or not by executing the below command:
javacIf the environment variable is not set on your machine it will throw an error message “ ‘javac’ is not recognized as an internal or external command”. Consider the following output:
Now, Follow the below steps to set the environment variable in Windows:
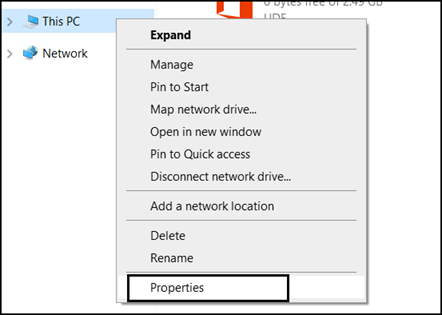
Step1: Open the System Properties
To open the system properties right-click on This PC and select the properties option.
Step2: Select Advanced System Settings
The next step is to select the Advanced System Settings from the left menu.

Step3: Select Environment Variables option
It will open a dialog window, select the Select Environment Variable option from this window.

Step4: Select New Class Variable
Now, select the New class variable from this window.

Step5: Enter Path Name & Value
Type the variable name as PATH andvariable Value.

The Variable can be found from the installed directory of the JDK under the bin folder. Navigate your directory where you have installed Java and copy the bin folder location of the JDK.

Paste this value in the above Variable Value field and click OK to continue.
Step5: Click OK to Finalize
Now, click OK on the main window of the environment variable.

Now, we have successfully set the environment variable in our system. We can save and run the Java program in any location of our system.
Step6: verify the Process
To verify the process run the javac command. It will display the output as follows:
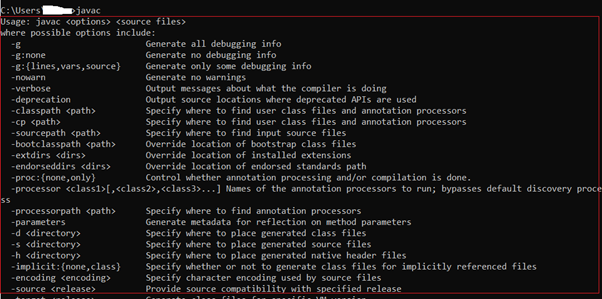
If your command prompt is not recognizing the javac command, restart your system.
Now, we can save and run the Java program anywhere on the system. Let’s test it by creating our First Java Program:
First Java Program
To create a first Java program, it will be good to create a separate workspace, create a folder with the choice of your name. We are creating a Java_Program folder under our user’s home location.
Now, create a text file with the name Hello.Java using any of favorite text editor in our workspace. Put the below code in it:
Hello.java:
public class Hello
{
public static void main (String args[])
{
System.out.println ("Hello JavaSterling");
}
}
Now save this file. We are using Notepad to create this file. Save it as follows:

Now compile this program using the below command:
javac Hello.JavaThe above program will compile the program and create a .class file having the machine code. Now, we can execute this class file by executing the below command:
java HelloIt will display the output as follows:

Summary:
Hence, we have seen how to install Java on Windows. Further, we have seen how to set environment variables and run our first Java program. So, this is it for this article. Check out other section for more Java tutorials.
Also See,
How to install Java on Linux
How to Install Java on Mac OS